How to make Sauerkraut

I love sauerkraut. I eat it almost every day. When it’s raw, it is full of probiotic bacteria, shown in lab tests to be more beneficial than probiotic supplements. While this post shows you how to make your own, if you do want to buy sauerkraut, make sure it is raw / unpasteurised, the pasteurisation process kills all the beneficial bacteria.

To start with, making sauerkraut might seem like a daunting task, and maybe it does seem that way the first few times you make it, but once you get used to it, it becomes second nature.

The basics ready for making sauerkraut

I find the recipe to be very flexible, it always works as long as you get the basics right. I use Kilner jars to make my sauerkraut, jars with a rubber seal and clasp (see photo above and photos of the finished sauerkraut in the jar near the end). Kilner jars are not necessary, but they make it slightly less likely to go wrong as they stop any oxygen getting into the jar so you never get mould. And at the same time, they allow any pressure building up in the jar to escape – if you use a jar which seals tightly you will need to open the jar every few days to allow the gasses to escape.

Ingredients

You can make sauerkraut with just cabbage and salt, after all sauerkraut is just the German word for sour cabbage. But we can make it much more interesting that. I choose a selection of seasonal vegetables from the farmers market.

Vegetables I use on a regular basis

Cabbage – green or red, regular, savoy, Chinese, take your pick
Carrot
Pumpkin/Squash
Broccoli
Cauliflower
Red/Yellow/Orange pepper
Courgette (zucchini)
Apple
Radish
Onion (I really like onion in sauerkraut, but don’t put too much as then it doesn’t taste good, half a medium onion per 1 litre works for me)

Other vegetables

Seaweed – I think I tried this once with dried wakame and it worked well, I need to experiment more!

Tomatoes – I once read that tomatoes don’t go in sauerkraut, but I have done it a few times and it worked fine for me. Maybe just a small amount if you use them.

Turnip – works ok, just not on my list of favourite vegetables!

Beans – seem to take longer to ferment than other vegetables, so you end up with the sauerkraut ready apart from the beans. I need to experiment more with this.

Cucumbers – traditionally fermented whole, I’ve never tried putting them in sauerkraut, I imagine they might disintegrate if they are chopped up

What not to put in

Aubergine – I tried once, didn’t really work
Avocado – I’ve never tried, but fatty foods are not usually fermented this way

Salt

I use 1 teaspoon per litre of finished sauerkraut – so if I’m using a 2 litre kilner jar I will use 2 teaspoons of salt. This is never measured very accurately and doesn’t matter too much. The basic principle is the more salt you add, the slower it will ferment. So if it gets really hot in summer and your sauerkraut is fermenting too fast, you can use a little more salt.

Herbs and Spices

You can add all kinds of spices, I particularly like ground coriander seeds. Other traditional spices are caraway seeds or juniper berries.

You can add fresh coriander, fennel, dill, etc, you can flavour it how you like.

Kimchi is a Korean fermented food made with Napa (Chinese) cabbage, which traditionally has a different method, but you can use kimchi spices to make spicy sauerkraut including chilli, ginger, garlic and onion.

Directions

Chopped Cabbage

Chop the cabbage

1. Remove the outer leaves of the cabbage and then chop. Or some people prefer to grate it.

2. Add the salt.

3. Smash the cabbage. This is where you need to find suitable tools. I have a wooden bowl and a wooden mallet. You could use the end of a rolling pin. The idea is to release all the juices from the cabbage.
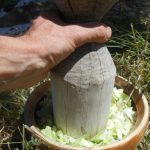
Mallet to smash the cabbage

Smash the cabbage

4. Chop the other vegetables. You will need approx 850g of veggies (including cabbage) per litre. I would suggest that you want approx half of this to be cabbage and the other half a mixture of vegetables. Other combinations will work, although if the amount of cabbage is too little there won’t be enough juices to cover everything (and maybe it stops being sauerkraut, there are many other ways to ferment vegetables, see my fermented butternut squashfermented broccoli and carrot with leek and fermented courgettes recipes).

To get an even ferment, size the pieces based on how quickly they will ferment, generally harder vegetables will take longer than softer ones. So for example pumpkin will need to be much smaller pieces compared to courgette and red pepper. (Note: Don’t smash the vegetables, you only smash the cabbage).

Chop the vegetables

5. Add any herbs and spices

6. Mix everything together well

7. Stuff into the jar. Really push everything down, the idea is that all the vegetables are covered by the liquid (which will have come out of the cabbage as you bashed it). Leave some space at the top of the jar – the liquid will rise up as it ferments, if you don’t leave enough space it will seep out the top of the jar.

Use a cabbage leaf and piece of stalk to keep everything pressed down under the juices

8. Place one of the outer cabbage leaves on top, then I use part of the stork to push the vegetables down into the liquid – see photo.

9. Leave at room temperature to ferment. Fermenting time depends on temperature, in the winter (in a relativly cold house) it can take up to 2 months, in summer (in Portugal) it can be ready in 1 week.

If you have any questions or comments, please leave them below. And let me know what your favourite sauerkraut ingredients are.

Finished jar of sauerkraut

Wild Food and Urban Foraging Calendar Review

I just received this calendar from Theresa Webb (Kitchen Buddy) and my first thought was “why didn’t I think of doing this!” It’s a wonderful idea, each month has it’s own selection of photos related to what you might be able to find. It’s not a wild food identification guide, just something to give you some inspiration for the month, with photos of wild leaves and flowers plus also dishes made with these plants.

Just a quick flick through and I’ve already learnt something new – fuchsia flowers are edible! This fascinated me so I did a quick bit of research and found that fuchsia berries are also edible. I found this blog post which says “The flowers and fruit of all fuchsia species are edible raw but flavours may vary considerably” and that the species Fuchsia splendens has the best fruits.

The month sections includes UK bank holidays, but unfortunately not moon phases (although these can easily be added by hand!) It is slightly larger than A5 when folded, and slightly larger than A4 when open.

The calendar costs £8.50 and is available direct from Kitchen Buddy.


Strange Plant: Chia Growing in our Garden

In August I found this plant growing right outside the house:Young Chia Plant

I’d never seen it before so I assumed it was something we had inadvertently introduced. I took a guess that it might by physalis (Incan berry, Physalis peruviana – yes even with a name like that it grows well in Europe!), it looked somewhat similar.

Anyway, as the months went by I realised it wasn’t physalis, but I didn’t know what it was. It has beautiful small blue flowers. Then yesterday by chance I saw a photo of a chia plant and the lightbulb went off in my head! So soon, we might be able to harvest some chia seeds

Chia plant in flowerChia Plants in flowerTall Chia Plant in flower

So, now you know, chia plants are easy to grow, just soak the seeds, scatter and wait!

Ginger flavoured Jun or Kombucha

Fresh GingerThis is a continuation of my earlier post Making Kombucha and Jun. At the point of bottling your jun or kombucha, you can additional flavours. It’s not something I have experimented too much with, but in the past I have tried raw cacao powder which worked well.

Recently I have been experimenting with ginger – grated fresh ginger worked well, I also tried adding a little turmeric for the medicinal properties, although I wasn’t too keen on the effect on the flavour.

Dried ginger power also works really well. In a previous batch I used 1 teaspoon per 1 litre bottle – good but not quite strong enough for me. This time I used 2 teaspoons per litre – slightly too strong for me… so I’m guessing 1 and a half teaspoons might be the perfect amount (well for me at least, you can experiment to see what you like!)

Note that adding ginger seems to make it more fizzy, so be careful when opening.

Let me know in the comments below what your favourite addition to jun or kombucha is.

New Organic and Fairtrade Clothing Website

Where my clothing comes from is something which has been close to my heart for a long time, ever since I first found out how clothes are usually made: in poor conditions, with slave labour, using cotton grown with a lot of chemicals, and/or synthetic materials made from petrochemicals.

Fairtrade Organic Hoodie with Om Symbol

From that point on, I tried my best to only buy ethical clothes made with natural materials, although due to price and availability this usually meant buying secondhand clothes. So, I’m really excited to announce the launch of my new website, Zazeka.com. If you’ve been following my work for a while, you will know I’ve dabbled in this area in the past, but now I’m really happy with this new project.

All the clothing we sell is organic, (most of it 100%, although some products have small amounts of recycled synthetic materials) and all is made by Fair Wear Foundation members, a non-profit organisation striving to improve working conditions in the textile industry. Some items are fairtrade and some are ultra low carbon footprint, generating 90% less carbon emissions than equivalent items. (Yeah, I know, it would be great if everything was fairtrade and low carbon, but that’s not available at the moment.)

Organic Women's Sweatshirt Organic Low Carbon Men's T-Shirt Organic Women's T-Shirt Organic Low Carbon Woman's T-Shirt

Please visit the site to see the whole range. If you want one of the designs on a different item, just let me know and I’ll set it up. I’m going to be adding more products and more designs – so let me know if you have ideas for designs you’d like to see.

I’d love any feedback you might have…

Making Kombucha and Jun

Kombucha is a probiotic drink with many health benefits. It is made by fermenting tea and sugar with a kombucha culture, known as a SCOBY (Symbiotic Community Of Bacteria and Yeasts). Sometimes this gets called a mushroom, although it is not actually a mushroom.

Jun is similar to kombucha but is made using a different SCOBY and uses honey instead of sugar. I started out making kombucha until I discovered jun. I prefer to use local honey rather than sugar, and I prefer the flavour so I stick to making jun now.

Health Benefits

There is a lot written about kombucha, but not much about jun. It is assumed that the health benefits are similar, some say jun is even better.

Kombucha is known to help with detoxification. In fact it is recommended that people new to kombucha start with only a small amount the first few days so that the detoxification is not too strong.

Like other fermented foods, jun and kombucha are full of probiotic lactobacillu bacteria which help with digestion and also the immune system.

Kombucha is also good for energy levels as it is high in B vitamins.

Recipe

This the recipe I use for jun. Kombucha is usually made with black tea rather than green tea, and sugar rather than honey, but the basic idea is the same.

I generally use a mix of green tea and rooibos tea (sometimes called red tea), and then with each batch I add various additional herbs, recently I’ve been using lemon verbena as I particularly like the resulting drink.

Different types of honey affect the flavour of the resulting jun, but the specific flavour of the honey is usually lost. Eg if you use lemon honey, the jun will not taste of lemon, although it will have a lighter flavour compared to if you used a stronger honey such as heather or chestnut which give a deeper flavour to the jun.

I use a 4 litre jar, although I don’t fill it to the top so make slightly less than 4 litres, here’s my recipe:

2 tablespoons green tea
2 tablespoons rooibos tea
2 tablespoons of another herb to give flavour or medicinal benefits – lemon verbena, chaga, chanca piedra, lemongrass, etc
375g honey

Make the tea. I generally make the tea in the evening and leave it to brew overnight and then I continue the next morning.

Mix the honey into the tea, until it is fully dissolved. Top up with more water but don’t overfill the jar.

A couple of weeks ago I put more honey in by accident, I used around 485g and it made very good jun, with a stronger flavour. Experiment and find the amounts you are happy with.

Add some jun from the last batch (if this is your first time, you should get some with the SCOBY) and put the SCOBY on top. (Where to get a SCOBY? If you have a friend making jun, ask them. The SOCBY will keep growing so you can share pieces of it with friends. If not you can try asking on this Facebook group.)

Cover with a light cloth, so it is open to air but dust and flies can’t get in.

Fermentation time is dependant on room temperature. I go from 8 days in winter to 7 days as it is getting warmer, to 6 days in summer. I live in Portugal and have no heating so room temperature varies quite a bit through the year. If you have heating you might find your room temperature stays more constant and you don’t need to vary the fermentation time. I usually taste it when I think it should be ready – with experience you will be able to tell whether it is ready or needs another day.

Use only glass or ceramic containers to ferment in – the acids in the jun or kombucha will eat into plastic and contaminate your drink and metal can kill the cultures.

Bottling

When the jun is ready, take the SCOBY from the top and reserve for your next batch. Strain the jun and put in bottles. The flavour improves and the jun will become fizzy from being in a bottle for a few days – I find a week is a very good time. You have to be careful at this point, bottles can explode if the pressure builds up too much. And be careful opening the bottle, it can spray out if there is too much pressure!

Now it is time to experiment! Recently I used lemongrass for the first time, the resulting jun had an amazing flavour like a bitter beer. Let me know your favourite herbs to use in the comments below.

Five Tips for Transitioning to a Raw Food Diet

Here are what I think are some of the more important points to think about for those new to raw food, from my 15 years of experience experimenting with various raw diets. If you think I have missed anything, please let me know in the comments.

1. Don’t think too much in terms of giving up foods

Instead, think about adding new foods to your diet. Fresh juicy fruit. Tasty salad with avocado and olives. Switch in raw replacements for your favourite foods. If you like cake, learn how to make delicious raw cake. If you like chocolate, there is plenty of raw chocolate available or you can make your own. Try our monthly raw snack box for regular inspiration.

And don’t worry about being perfect or “100% raw”, etc. There are no rules. Eat in the way which works for you.

2. But try to avoid these foods

Having said that, there are a few foods that giving up would really help you on your journey: wheat/gluten and pasteurised dairy. If you still want to eat dairy, raw dairy is much healthier for you, although should best to limit.

3. Include fermented foods

These will help your digestive system and help you to get the most nutrients from your food. You can very easily make your own fermented foods, or you can buy them, but if you buy make sure they are raw/unpasteurised – pasteurised fermented foods are quite pointless as all the beneficial bacteria are killed!

I love to make sauerkraut (fermented cabbage and other vegetables), or you can buy ready made sauerkraut in various flavours. Jun is another favourite of mine, it’s like kombucha but made with honey instead of sugar. I also make a range of fermented drinks depending what fruits are in season, you can try all kinds of fruit, but here are my recipes for fermented tangerine or orange drink and fermented grape drink.

4. Make sure you eat enough fat and denser foods

Yes, I know this is probably the opposite to the advice many raw fooders will give, but in my experience it is important to eat enough fat otherwise you will either be hungry all the time, or eating all the time.

Personally I like avocados, usually one per day, plus hemp seeds (in my breakfast). Other nuts and seeds including sesame seedschia seedspumpkin seeds and almonds all play a role, generally always soaked, or ready prepared by soaking and then dehydrating such as this range from Raw Ecstasy.

I also eat three raw eggs per day (local, free range, from a friend who looks after the chickens and ducks well) and a small amount of meat or fish a couple of times a week, of course you need to find which foods work for you.

5. Keep being inspired

Get yourself some raw recipe books and keep making new foods. Or search for new recipes online, there are lots, including here on my blog. Go to potlucks and meet other people interested in healthy diets. Go to festivals, workshops and retreats and you will keep learning.

Let me know your best tip for transitioning to raw food in the comments.

How to make Fermented Tangerine Drink & Natural Lemonade

I love this recipe, it’s so simple but makes a really delicious and refreshing drink, naturally carbonated. Plus it contains natural beneficial probiotic bacteria from the fermentation.

Tangerine Drink

Ingredients to make 1 litre – just multiply up to make larger quantities (I usually make 4 litres)

I usually make this with honey, but I experimented with dried figs as an alternative. I’m sure you could experiment with other sweeteners, although honey and figs both have natural yeasts which probably help with the fermentation.

Method

Squeeze the tangerines. I like to add the pulp too. Stir in the other ingredients. If using honey stir until it is completely dissolved. If using figs, chop into quarters. You can remove the figs after 3 or 4 days if they have floated to the top. You can eat them but they will have given all their flavour to your drink!

Top up with water, but don’t fill right to the top.

I like to use a kilner jar (as pictured), this has a rubber seal which allows gasses to escape during fermentation, but doesn’t allow oxygen back in. If you use a jar with a tight seal, you will need to open it every day or so, otherwise it could explode…

Leave to ferment. I turn the jar upside down once a day to mix the contents up a bit, I think this makes it ferment a little quicker. The time depends on temperature, I find usually it is ready in 5 to 7 days. You can tell when it is getting ready as you will see small bubbles, and some of the pulp tends to float to the top as you can see in this photo.

Start tasting it every day, it will constantly change. Once it is to your liking, you can put it in bottles and put in the fridge, this will slow the fermentation down so that it will change less.

Orangeade

Follow exactly the same recipe as above, just substitute freshly squeezed orange juice. Just be careful not to squeeze the orange too hard at the end or you will get some of the bitter oils from the skin in the juice which negatively affects the flavour.

LemonaidLemonade – makes 1 litre

I had to adjust the recipe slightly for lemons:

  • 200ml freshly squeezed lemon juice (or maybe less, see below)
  • 1 tablespoon raw honey
  • pinch of salt
  • water (approx 800ml)

Note slightly less lemon juice, and 3 times as much honey (1 tablespoon rather than 1 teaspoon). I’ve not tried this with dried figs, but if you want to try I would  try 6.

And the other major difference is fermentation time, it takes much longer. I’d actually given up on this recipe, but tried it again today and found that it is finally ready, almost exactly one month since I made it. (Maybe it has been ready for a while, I’ve probably not tasted it for 2 weeks.)

Actually, I’m drinking this as I write, and maybe 200ml is still too much lemon juice, it is quite acidic in the back of my throat. If I was making this again I might try only 150ml. If yours turns out too strong, just dilute with water when you want to drink it.

Tips and Ticks

Once I tried adding orange zest to the ferment – it didn’t work, it really slowed down the fermentation process and didn’t particularly make much difference to the flavour.

Approximate amount of juice, of course this will vary with fruit size:

250ml tangerine juice = approx 6 tangerines

200ml lemon juice = approx 4 lemons

Oranges are much more variable in size so harder to say, but 250ml is probably somewhere between 2 to 4 oranges.

Let me know what you think if you try this. Any improvements?

Mulberry Chocolate Recipe

Mulberries in bowlWhen I was younger, all I knew about mulberries was the nursery rhyme “Here we go round the mulberry bush”, and even that was wrong, mulberries grow on trees! It wasn’t until I was in my twenties that I tasted my first mulberry, when I was in Sicily. It was a fresh white one, and I love it. I then tried black ones and loved those too.

I’ve since found that you can grow mulberries in the UK, at least in the south, although they are a lot more common in the Mediterranean.

Mulberries are great nutritionally, they are high in vitamin C, magnesium, iron and some B vitamins, plus they contain the antioxidant resveratrol which may have health benefits, lots of studies are been done on it.

While fresh mulberries are amazing and are one of my favourite fruits, they are only available for a couple of months in the summer, but dried mulberries are available all the time and amazing for making all sorts of sweet recipes. I particularly like to use them to make raw cake bases along with walnuts or other nuts.

Ground mulberriesMulberries go really well with chocolate, here’s my recipe:

40g cacao paste
25g cacao butter
15g coconut butter
45g dried mulberries, ground
35g lucuma powder
20g carob powder
½ teaspoon raw honey (optional)
1 tsp vanilla powder (optional, but really improves the flavour)

(Note, if you prefer to use cacao powder rather than paste, you can use approx 20g cacao powder and change to 45g cacao butter.)

The first step is to grind the mulberries. I did this in my Vitamix, although a coffee grinder might also work. I did it in small batches as they get sticky and clump together – don’t grind for too long as this makes them stick back together. I then put them through a sieve to remove the larger chunks.

Melt the cacao butter, cacao paste and coconut butter gently (I use a bowl in a pan of warm water). Once it is all liquid, slowly stir in the rest of the ingredients. You want the consistency to be fairly stiff, if it seems too liquid, add a little more lucuma, carob or mulberries.

Pour into moulds and put in the fridge to set. The chocolate is slightly chewy, not smooth, hope you like it.

Finished chocolates